This site can’t be reached in WordPress is a frustrating error because what are you to do if your site is telling you it can’t be reached. Well, plenty.
There are different reasons why your WordPress site is presenting you with this error. A majority of these reasons are not as bad as the ‘consequence’.
In this article, we are going to discuss the causes of this error, how to check a specific cause for this error, and how to solve the error.
How to check the cause of ‘this site can’t be reached WordPress?’
While ‘this site can’t be reached error’ is presented by Chrome, Chrome won’t tell you the exact cause of the error. Instead, it will randomly present you with plausible causes and expect you to figure it out on your own.
Sometimes internet connection is a suspected cause. Here, chrome will give you a connection troubleshooting link.

Use the link. If the troubleshooting results say all is well, then you know that internet connection is out of question.
Overall, what you really want to know before you do anything is whether your site can’t be reached only on your browser or on other people’s browser too.
Using Website Planet, you can check if your website is out of reach on your browser only or elsewhere too.
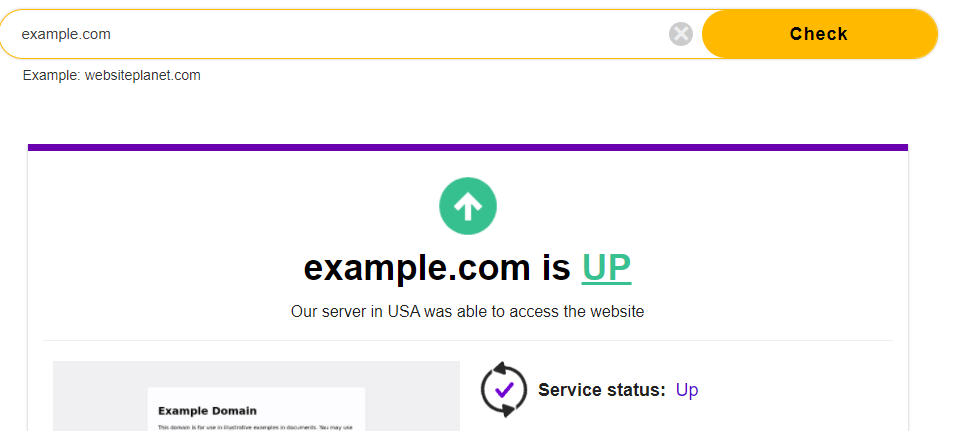
If the results look like the picture above, that means your site can’t be reached only on your browser.

If the results look like the picture above, that means your site can’t be reached not only on your browser, but elsewhere too.
Depending on the cause of your error, one of the following causes and solutions will apply to you and solve this error.
How to fix ‘this site can’t be reached in WordPress’?
The following are ways to fix ‘this site can’t be reached error’. The solutions are divided between a site that can be reached by a site monitoring tool and a site that can’t be reached by a site monitoring tool.
Let’s get into it.
A. For a site that can be reached by Website Planet
1. Restart your internet connection
If Internet connection is the cause of your ‘this site can’t be reached error’, simply restarting your internet connection can fix the error.
This process is pretty straightforward. Depending on your source of internet, you can restart your router, unplug your modem power cable, etc. As long as the process restarts your connection.
2. Clear your browser cache
Sometimes the ‘site can’t be reached error’ has little to do with WordPress and everything to do with your browser cache.
Because your browser stores information about sites you visit to reduce loading time, sometimes there can be a problem with the cached files and this ultimately causes your browser to fail to reach your WordPress site.
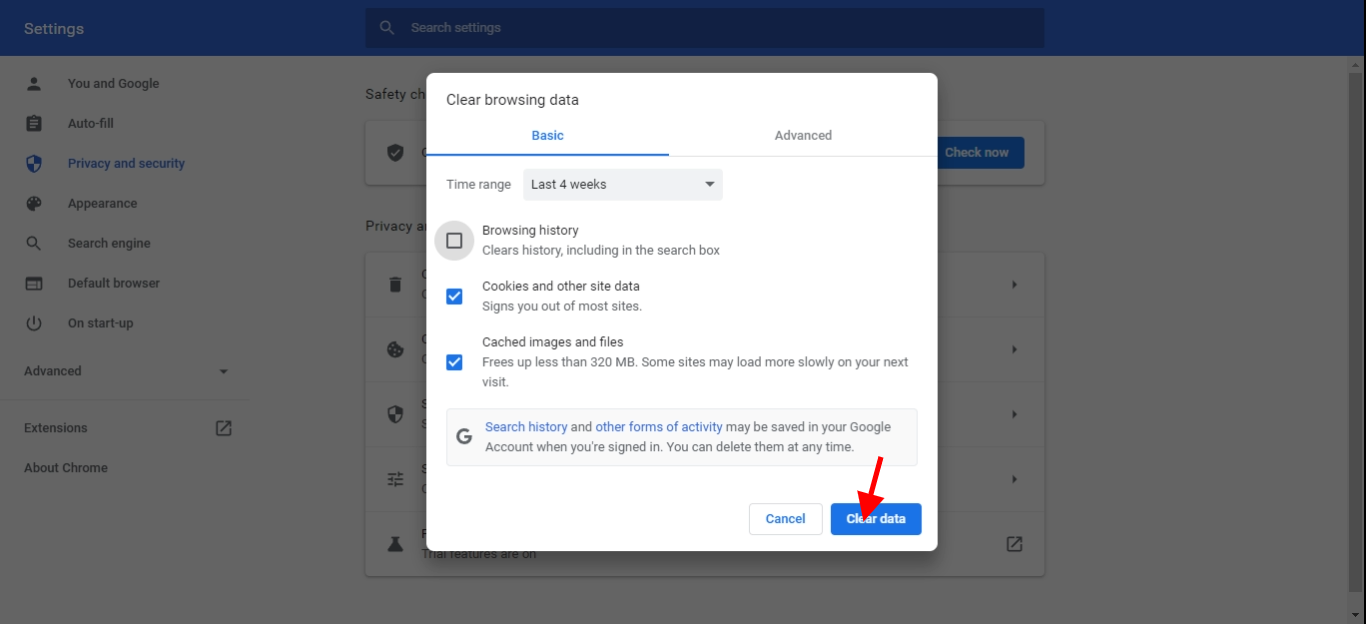
To clear browser cache, click the 3 dots on the top right of your browser, go to settings > privacy and security > clear browsing data > select cached images and files > press clear cache.
3. Disable your computer’s firewall
Just like websites, computers can be attacked too, and thus, they have their own firewalls. Sometimes, these firewalls can stop your computer from establishing a stable internet connection. When this happens, you can struggle to reach websites on your browser.
Disable Windows firewall Disable MacOS Firewall.
4. Flush DNS cache
Whenever you visit websites on your browser, the DNS cache captures recently-visited IP addresses and saves them in a database. This happens so to reduce your browser loading time next time you visit previously visited browsers again.
Sometimes the DNS cache can be corrupted or outdated. Either way, these instances can cause internet connectivity problems between your browser and your source of internet connection resulting in ‘this site can’t site can’t be reached error’.
When this happens, you have to flush the DNS cache both on your Operating system and browser.
Flush DNS cache on MacOS, Windows and Linux here.
To flush DNS on chrome, open a new window tab and paste chrome://net-internals/#dns in the address bar.
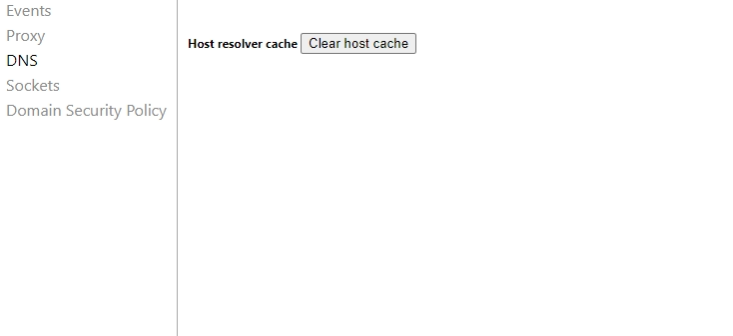
Click ‘clear host cache’ and your DNS cache will be flushed.
B. For a site that can’t be reached by a Website planet
1. Make sure your domain is up and running.
Domains expire annually. Failure to renew your domain on the set expiry date results in your domain becoming inactive. This means any service associated with your domain will cease to function. And this includes your website.
You can renew your domain with whoever you bought it from. Ideally, you should set your domain to renew automatically and avoid the risk of losing it forever.
2. Check if your DNS records are correct and pointing to the right IP address
Your website has DNS records that translate domain names to different IP addresses so that browsers trying to access your website can load your website content.
When DNS server configurations are not correct, a ‘this site can’t be reached’ error is present. This problem usually happens when a site has been migrated but DNS servers were not updated.
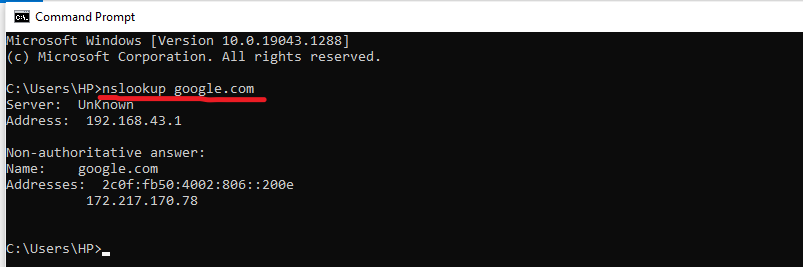
To check your DNS records, you will need to use a terminal with the command nslookup on your operating system.
- Press start or search bar on your windows PC
- Search for cmd or command and open the command prompt that appears
- Type in {nslookup yourdomain.com} just before users on your command and hit enter
This is an example of what your command should pull out. (We are using Google.com as an example)
Now type in {nslookup -type=NS yourdomain.com} and hit enter
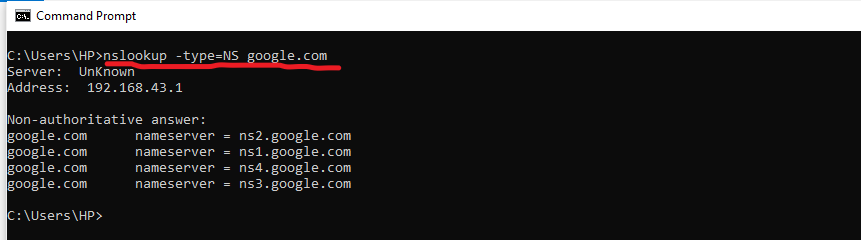
Your query will now show your domain name servers.
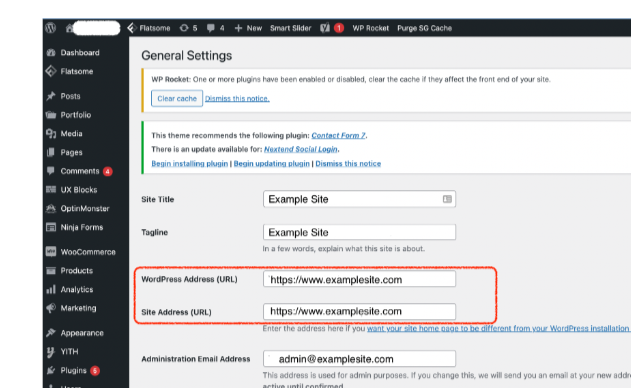
3. Check if your site’s URL is set correctly in WP configuration
If, for any reason, your WordPress site’s url is not set up correctly in your WP-config file then users will not be able to access your site when they search for it.
Fortunately, you can set up your WordPress site URL manually. But before you do that, you need to know exactly how your site’s URL is supposed to be. Is it in http or https? What is the exact domain name? — Whatever the case, your site’s URLs have to be correct because they reference the address of your website on the internet and the location of your website files.
If you can access your WordPress admin dashboard the simplest way to check would be to click on Settings > General on your WordPress sidebar menu. After this, you should see a page with general settings.
From here you can change WordPress site URLs under the ‘WordPress Address’ and ‘Site Address’ options.
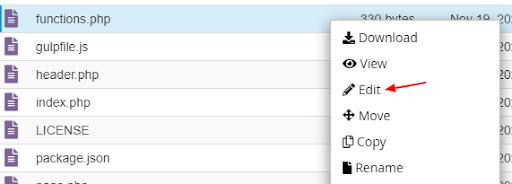
Sometimes this setting might be grayed out and can only be configured from the server. This is a thing for sites hosted on Flywheel.
In that case, login to your CPanel or access your server using FTP client.
Inside your CPanel, click the file manager followed by the public_html file.
Inside your publich_html file go to /wp-content/themes/your-theme-folder/php function.
4. Check htaccess file for misconfigurations
. htaccess is a basic server configuration file you can use to make sure your website pages load with www or not. It also makes sure there’s a https setting and other server options that ensure a site is set up correctly.
When an htaccess file is not set up correctly you can come across problems like missing website pages, inaccessible links and even an unreachable site.
. htaccess files are kind of complicated and may be hard to understand for non developers because 1) They vary depending on site 2)There are many things to consider and check when configuring the overall state of an htaccess file.
If you want to rule out the htaccess file on your own check and make sure the ‘htaccess file has contents. If it does not then naturally there should be a problem with your site.
- Access your site via Cpanel or FTP client
- Look for and click the file manager
- In the file manager look for your root directory named public_html
- Inside your root directory, locate your htaccess file
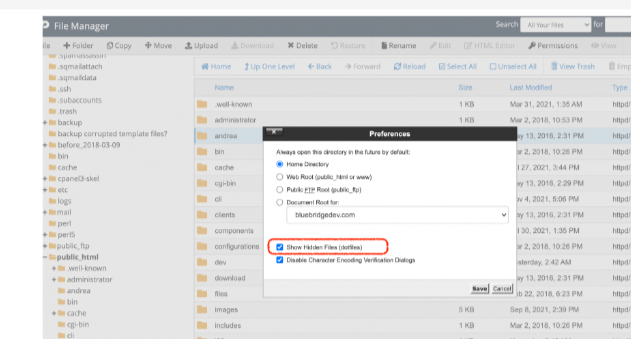
If you are using an FTP client you may need to enable the option inside the file manager.
- Click the ‘settings’ button on the top right of the file manager
- Select “show hidden files (dotfiles)”
5. Check the debug log for better error indications
If you tried the above recommendations and none applies to your site then you have to resort to the debug log.
A debug log will help you find the exact cause of your error by displaying all PHP errors, notices and warnings.
- Log into your CPanel
- Look for file manager and click it

- In side your file manager look for your root directory name public_html and click on it

- Click Open your wp-config.php file
Make sure that wp-debug looks like this ‘define( 'WP_DEBUG', true );. For your errors to be logged, add define( 'WP_DEBUG_LOG', true ); in your wp-config.php file just below the WP_DEBUG line and save.
- Go back to your public_html file and look for the wp-content folder and you should find a file named debug.log.
You can download, view, or edit this file. It will contain all WordPress errors, warnings, and notices that were logged.
Depending on what you find inside your debug log, you might need a WordPress Developer’s help to fix the error. We are always available to help. Get in touch with us through our Emergency WordPress support.