Did you just update something in WordPress and now your website has what we call a WordPress update fatal error? Don’t panic — this is a common WordPress issue.
In this guide we are going to learn about the WordPress update fatal error is, what causes it and how to fix the different fatal errors caused by different WordPress updates.
What causes WordPress update fatal error?
WordPress update fatal error happens when you update something in WordPress i.e. Plugin, Theme and WordPress core — And that update completely breaks your website code both in the front end and back end.
The specific error you encounter depends on the exact cause of the error. Some errors have a specified code and some errors cause a white screen of death (WSOD).
A white screen of death is usually caused by a php fatal error caused by a plugin, theme or WordPress update gone wrong. Sometimes it's because the PHP memory limit was exhausted.

How to fix WordPress update fatal errors
The first thing you want to do is get your WordPress website back live. This needs you to turn on WordPress debug mode.
WordPress debug mode is the built-in functionality that displays the error message on the front end of your WordPress site. Debug mode is what will guide you to find the root cause of your WordPress error.
Starting with this step-by-step guide.
Access server files
To safely access your server files, you will have to do the process via SFTP/FTP or CPanel.
SFTP is Secure File Transfer Protocol. It allows you to transfer files between your website and server by establishing a secure connection. This means that your files are encrypted and can’t be read by third parties.
You can use either method, both achieve the same results. The main point of doing this is for you to access your root directory.
Using cPanel to modify site files - Option 1
Many web hosts provide CPanel accounts to their clients when they host with them. If your hosting does not provide CPanel or a comparable hosting control panel with a file manager, see below for instructions on setting up SFTP.
For those whose hosting provides CPanel, you can find a link to your CPanel login portal via your hosting providers' dashboard.

After accessing your cPanel, a menu with different options will appear. Go to the file manager and click it.

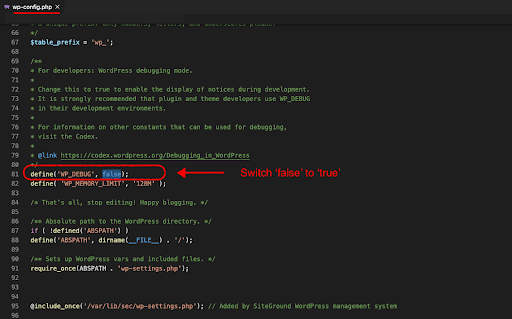
Inside the file manager, your root directory will be named …/public_html — click it and proceed to locate wp-config.php file.

Inside wp-config.php, change the WP-DEBUG from false to true.
Using SFTP or FTP to modify site files - Option 2
You need an FTP client to access SFTP or FTP. Below are free SFTP or FTP clients you can download and use.
- 1. FileZilla - For Windows, Mac OS X, and Linux.
- 2. CyberDuck - For windows and Mac OS
- 3. WinSCP - Known to work on different devices
- 4. Monstaftp - Web based and works online
- 5. Solar Winds - For windows
After downloading the FTP client you want to use, there are few things you need to configure before accessing your root directory.
The installation process may differ for some FTP clients but they usually follow the same steps.
If the FTP client you are using also allows file sharing via both SFTP and FTP connections, you may have to manually choose to use a SFTP connection from their menu.
To access your server, you need to provide some information. Your hosting provider should have provided you with the information you need when you started hosting with them.
- Enter your server URL as sftp://example.com
- Enter FTP username
- Enter FTP password
- Enter Port 22
- Connect to your server
The process is the same for both FTP and SFTP connections. The difference is SFTP port is 22 and FTP port is 21.
After accessing your server, look for the root directory. From your root directory, navigate to the wp-config.php file.
Once you’re in that file, follow the line of code “define (‘WP_DEBUG’, false);” and change the word ‘false’ to ‘true’.
After following these steps, go to your WordPress website login portal. This is the front end of your website. Refresh the login page. After that, the page should now show any error messages that exist.

You usually need a WordPress developer to fix a fatal error like the one above. In this case; a syntax error, some loop or condition wasn’t closed properly.
For a fatal error caused by a failed plugin, theme or WordPress update; the section highlighted in red is where there will be a brief explanation of the type of error that occurred.
The part pointed at by the blue arrow is the file path and the line number. Here, you can find out which specific update caused your website fatal error and where to fix it.
When you are done, make sure you close the server.
How to fix different WordPress update fatal errors
Now that you know how to identify a fatal error, we are going to go through the different types of fatal errors; their specific causes and how to fix each type of error.
Sometimes a plugin, theme, and WordPress configuration settings are incompatible. As such, updating either or installing either can result in a fatal error that breaks your website code.
With that said, here’s how you can fix each WordPress update fatal error.
Note: this is a continuation from the first part of this post
WordPress fatal error caused by a theme update:
- Go to the root directory folder
- Go to wp-content folder
- Open themes folder
Before doing anything, make a copy of the file so your information is still available to troubleshoot afterward.
- Delete the theme from your site completely by either:
- deleting the entire folder
- renaming the folder
After you do this, WordPress will no longer recognize the folder as an active theme. It will automatically use one of the built-in themes that came with the installation to display your site. If you were activating a new theme, simply choose to re-active your previous working theme.
Ideally, you should have a working backup of your site so you can revert to the previous version of your live site.
WordPress fatal error caused by a plugin update:
- Go to the root directory folder
- Go to wp-content folder
- Open plugins folder
If your website broke after installing a new plugin, similarly to themes, you will need to either:
- Completely remove the plugin
- Rename the plugin from the server.
If your website broke after an update, you have the option of choosing to revert to the previous plugin version before you updated it. Then you would have to troubleshoot the issue on a staging area (see below) before making changes.
It is recommended that you troubleshoot all your plugins one by one to pinpoint the exact issue. This can be a long process but it’s safe and worth it.
WordPress fatal error caused by WordPress update
WordPress updates don’t happen often. You only need to implement them when a new WordPress version is released.
If your WordPress breaks after updating your WordPress core:
- Go to server files
- Rename your active theme - site will revert to default theme
If this does not work, an alternative option is to repeat this procedure with each plugin and find which one is causing the problem.
After renaming all plugins, refresh your website to see if it’s restored.
How to prevent a WordPress update fatal error
Below are different ways to prevent a WordPress update fatl error before it happens.
1. Check for the following before installing a new plugin or theme.
- Check if the plugin or theme is compatible with your WordPress version
- Check if the plugin has been recently updated by the developers
- Check the PHP version the plugin requires

A plugin or theme that hasn’t been updated in over a year is likely out of date with the latest WordPress standards and hasn’t been tested for your WordPress version. Don’t install such a plugin.

2. Set up a staging area for WordPress updates troubleshooting.
To avoid breaking your website again, you need a staging area. A staging area is a clone of your website that is not available for visitors.You can use the clone to test out updates before making them on your live website.
Below are applications and plugins you can use to set up a staging area.
- WP Staging - Wp Staging is a staging area plugin available for installation on WordPress. This is the best option for a minimal admin process.
- cPanel - Most hosting providers create a cPanel account on your behalf. All you have to do is login into your cPanel and follow the instructions to set a staging site. We don’t recommend this process for beginners.
- UpdraftClone - UpdraftClone is a staging area solution by a notable product for different WordPress practices, UpdraftPlus.
- Set using your hosting provider - Processes may differ depending on your hosting provider. First, check with your hosting provider if they offer the staging area option and take it from there.
- Localwp - This is a free application you can use to set up a local, offline staging site on your computer. The instructions are straightforward and you will be guided all the way through the process.
This guide focused specifically on fixing WordPress fatal errors caused by an update gone wrong. Besides updates going wrong, there are many common WordPress errors which you can check out from one of our favourite guides on the net by clicking that link.
If all else fails
If all else fails, our WordPress developers are available to help you. All you have to do is request to fix your WordPress errors through our WordPress emergency support offer.